Apollo跳转链接:https://www.apolloproxy.com/
本指南将向您真实如何将Apollo Proxy集成到VMLogin指纹浏览器中,如果您正在经营电商业务,您将了解如何避免账户被封,通过多登录平衡物理设备的限制,毫不费力地拓展您的业务。
如何将Apollo Proxy集成到VMLogin浏览器
步骤1.获取Apollo Proxy
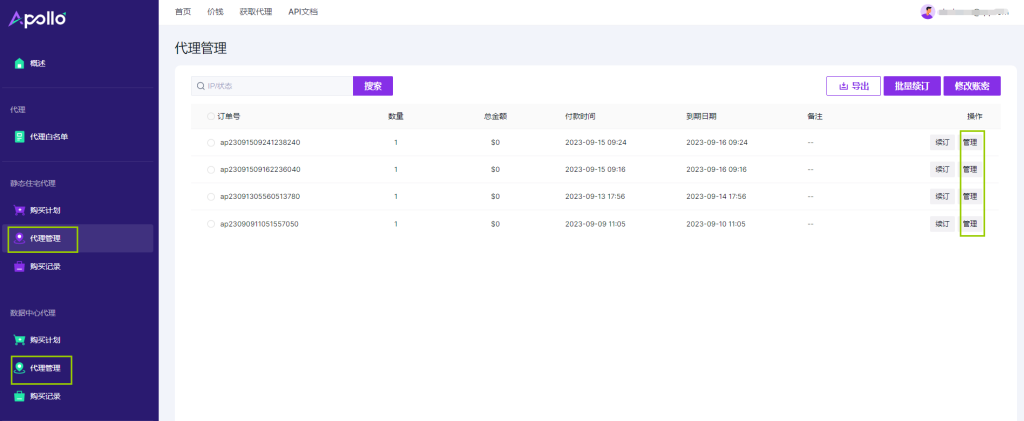
注册并登录您的Apollo Proxy账户并转到静态住宅代理/数据中心代理“代理管理”。在这里,您将看到您已购买的代理包。单击“管理”,您将看到代理详细信息,保持此窗口打开并继续下一步。


步骤2.创建新配置文件并添加Apollo Proxy
打开VMLogin客户端,点击“Create a new Profile”创建配置文件。 (新用户可免费试用3天)

复制Apollo代理帐户、代理密码、代理主机和代理端口信息,然后在 VMLOGIN 中填写代理设置。

点击“测试代理”,确认并保存即可。

Apollo Proxy – 跨境电商,指纹浏览器的强大支持者
Apollo Proxy根据业务场景筛选高质量ISP资源,保证独享一对一IP服务,防止账号关联,依托纯净的ISP资源让您的业务有更优秀的表现。10个+供应商(isp)分配部署IP,东南亚,北美,南美,欧洲,澳洲,日韩等地区严选资源,满足不同业务场景,API接口线上化开通,续费,调用调试。
Apollo Proxy的主要特点
- 家庭住宅ISP / 家庭带宽ISP
- 单ISP资源 / 双ISP资源
- 100+地区覆盖,3小时拓展新资源
- HTTP(S)/ SOCKS5协议
- 支持UDP/TCP/DNS定制
- 99.9%正常运行时间
- 易于与第三方软件集成
- 无限线程和并发会话
- 国家和城市级别定位
How to integrate Apollo Proxy with VMLogin browser
This guide will show you how to integrate Apollo Proxy into the VMLogin browser. If you are running an e-commerce business, you will learn how to avoid account suspension, balance the limitations of physical devices through multiple logins, and expand your business effortlessly. business.
Apollo Proxy – Cross-border e-commerce, a strong supporter of fingerprint browsers
Apollo Proxy selects high-quality ISP resources based on business scenarios, guarantees exclusive one-to-one IP services, prevents account association, and relies on pure ISP resources to enable your business to perform better. 10+ suppliers (ISPs) allocate and deploy IP, and carefully select resources in Southeast Asia, North America, South America, Europe, Australia, Japan and South Korea to meet different business scenarios. The API interface is opened, renewed, and called for debugging online.
Main features of Apollo Proxy
- lHome Residential ISP/Home Bandwidth ISP
- lSingle ISP resources / dual ISP resources
- l100+ area coverage, expand new resources in 3 hours
- lHTTP(S)/SOCKS5 protocol
- lSupport UDP/TCP/DNS customization
- l99.9% uptime
- lEasy to integrate with third-party software
- lUnlimited threads and concurrent sessions
- lNational and city level positioning
Step 1. Get Apollo Proxy
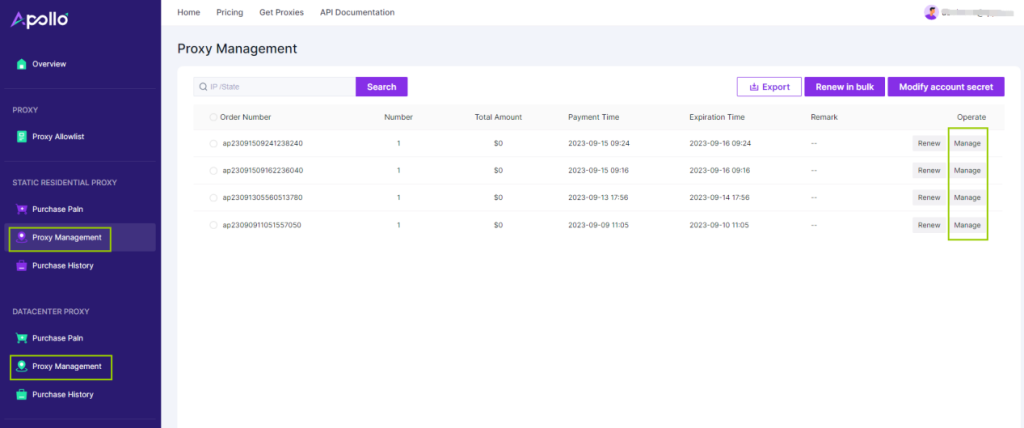
Register and log into your Apollo Proxy account and go to Static Residential Proxy/Data Center Proxy “Proxy Management”. Here you will see the agent package you have purchased. Click on Manage and you will see the agent details, keep this window open and proceed to the next step.


Step 2. Create a new configuration file and add Apollo Proxy
Open the VMLogin client and click “Create a new Profile” to create a configuration file. (New users can try it for free for 3 days)

Copy the Apollo proxy account, proxy password, proxy host, and proxy port information, and then fill in the proxy settings in VMLOGIN.

Click “Test Proxy”, confirm and save.
